 Last modified:
Wednesday, 11-Apr-2018 13:43:22 UTC. Maintained by: Elisa E. Beshero-Bondar
(eeb4 at psu.edu). Powered by firebellies. Last modified:
Wednesday, 11-Apr-2018 13:43:22 UTC. Maintained by: Elisa E. Beshero-Bondar
(eeb4 at psu.edu). Powered by firebellies.
Last modified:
Wednesday, 11-Apr-2018 13:43:22 UTC. Maintained by: Elisa E. Beshero-Bondar
(eeb4 at psu.edu). Powered by firebellies. Last modified:
Wednesday, 11-Apr-2018 13:43:22 UTC. Maintained by: Elisa E. Beshero-Bondar
(eeb4 at psu.edu). Powered by firebellies.In this exercise, we will enhance our output from SVG Exercises 2 and 3, that is, the timeline we output in SVG from XQuery on the Digital Mitford letters collection stored in our eXist database. At that stage, we output a vertical timeline that ran down the screen and required scrolling, and we plotted a parallel line showing how just one correspondent, Benjamin Robert Haydon, aligned with the total collection timeline. The parallel line marked the earliest and latest letters addressed to him and indicated the stretch of time represented by his letters.
Your task is to create a timeline that can sit on a project webpage as a clickable infographic that helps us to survey the contents of our collection of files. Our sample output looks like this screen capture (but we will refrain from showing you the clickable output until you have completed the assignment):
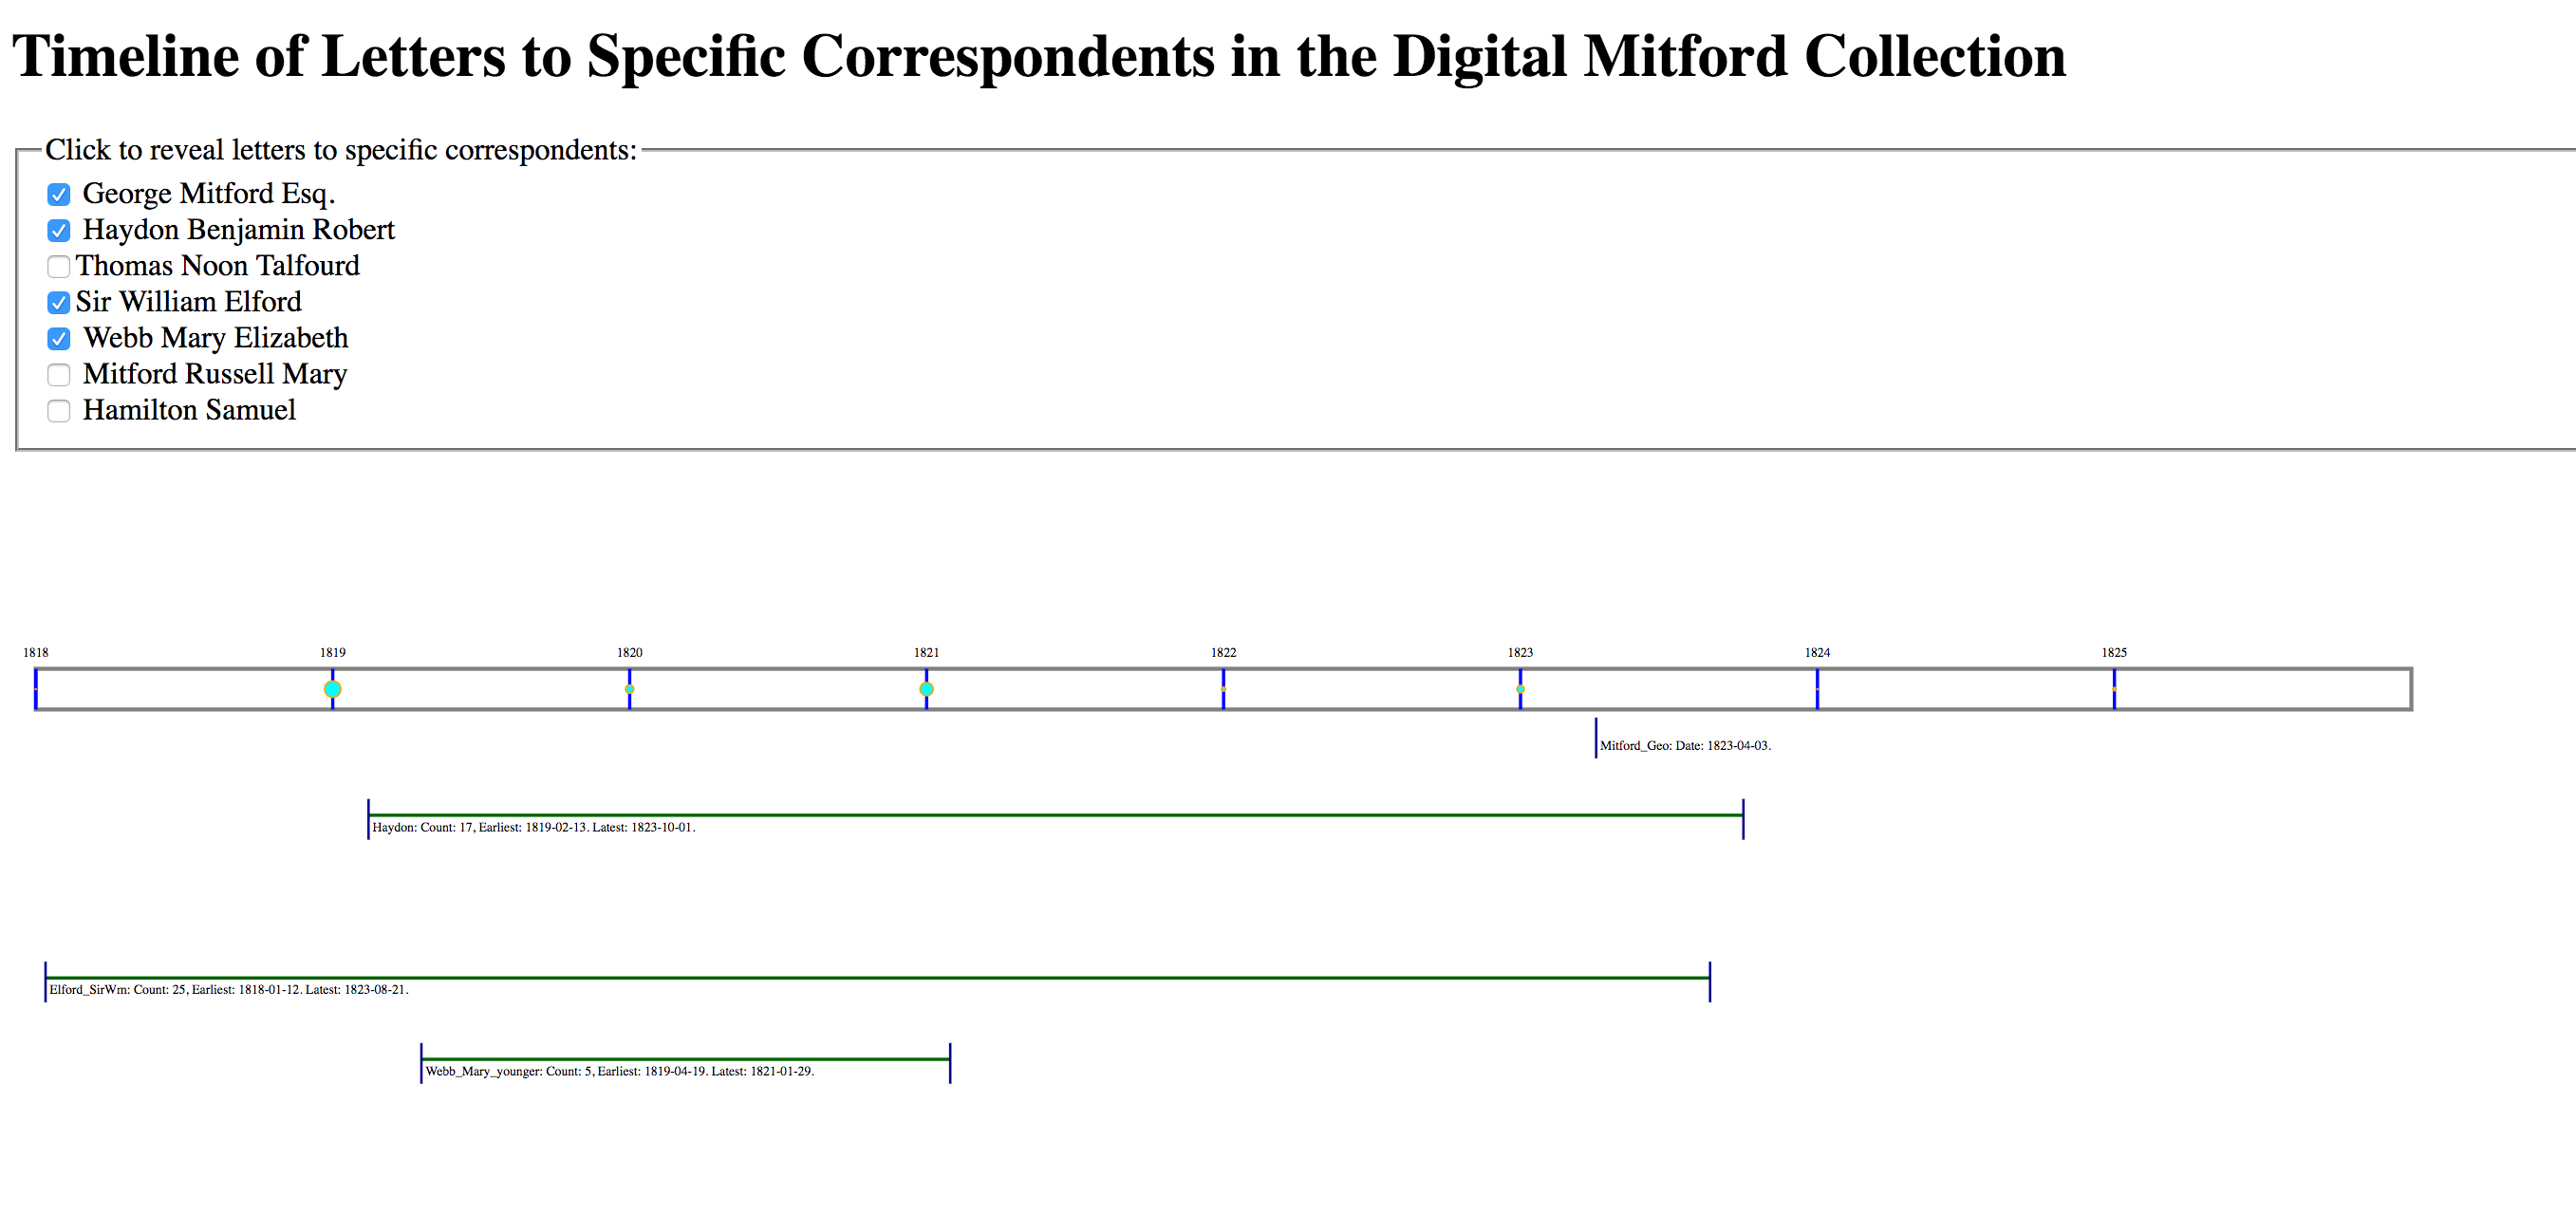
As shown in the screen capture image, a clicked checkbox shows or hides a line indicating a
timespan associated with a particular Mitford correspondent. When a checkbox is clicked,
this triggers a JavaScript function to fire to check whether a specific SVG
<g> element, is displaying or hidden.
To reconstruct our old SVG output into a dynamic webpage involves some alterations to the original XQuery we wrote, prior to drafting JavaScript. You will need to do the following:
Optimally, we want to generate our HTML page with SVG set within it, so that the same XQuery functions generate the entire page. This is a bit of a challenge for outputting code in multiple namespaces. Here is how we did it:
Note that you can really reverse the default output namespace and make it HTML
rather than SVG. That is up to you, but whatever output namespace you choose, the
other one must be prefixed in your XQuery script. That means that in our
script, every time we indicate an HTML element, we place an htm: prefix
in front of it.
Here is the code we used to define the namespaces as global variables at the top of our XQuery script (highlighting the prefix definitions):
               xquery version "3.0";
               declare default element namespace "http://www.w3.org/2000/svg";
               declare namespace tei="http://www.tei-c.org/ns/1.0";
               declare namespace htm="http://www.w3.org/1999/xhtml";
dereference(or look up) the first standard full name of each correspondent as listed in the Digital Mitford site index file, which is posted on the web here:
http://digitalmitford.org/si.xml:
declare variable $col := collection ('/db/mitford');
                 declare variable $letCol := collection ('/db/mitford/letters');
                       (: other variables here. . . :)
                declare variable $letterRecipients := $letFiles/descendant::tei:titleStmt/tei:title/tei:persName/@ref;
                 declare variable $distLetterRecips := distinct-values($letterRecipients);
                 declare variable $si := doc('http://digitalmitford.org/si.xml');
Dereferencing isn’t strictly necessary for our assignment, but it is a nice touch for
display on the Mitford project’s website, where we can use it in our output HTML to list
a full name rather than just an id value as our list of letter correspondents. Consider
that a bonus challenge for the assignment: instead of just listing out the @ref values,
can you output in the HTML a list of the full names of the letter writers? Hint: In our
code, when we wrote a for loop to step through the distinct
@ref values, we looked up in the
http://digitalmitford.org/si.xml file the first
<tei:persName> child of the <tei:person>
element whose @xml:id equals the current index variable in the loop. div type="svg" element (with the
namespace prefix if you prefixed HTML: <htm:div type="svg">). You can
apply styling to adjust the dimensions of the div, but you can control the dimensions of
the SVG viewport so that your timelines will fit on a screen.FLWOR, we found we had to create two
for loops over the set of distinct values of correspondents in the
collection, one placed near the top of the HTML page, and the other within the SVG
portion of the file. Note the following: <htm:input type="checkbox"> element to
generate our checkboxes, and we placed an @id attribute on each one.
(To read more about HTML checkbox inputs, see https://developer.mozilla.org/en-US/docs/Web/HTML/Element/input/checkbox
).Our checkbox basically just responds to a mouseclick, and with JavaScript we
will make the presence or absence of a check correspond with the display
properties of the corresponding SVG line. Note: You do not have to use a checkbox:
you could use a htm:button or even an htm:span element
that you might stylize in CSS. You simply need for the element to hold an
@id attribute that corresponds to each member of your list of
distinct values. In order for that @id value to be valid, you will
need to remove the hashtag from the front of the string retrieved from the TEI
@ref attributes.for loop to output SVG
<line> and <text> elements spaced down
the page, and we wrap these in an SVG <g>, on which we place an
@id attribute. However, we are not allowed to use the same
@id value twice on the same document, so we wrote a short string
of prefixing text to distinguish one from the other. (We put SVG_ in
front of the distinct correspondent value identifying its group of SVG elements,
but we could just as easily have put something like HTM_ in front of
the @id on the HTML input element.)$pos variable in our XQuery for loop: for $i at $pos in $variableWeAreLoopingThrough.for loop values. Remember that
the minimum year for a correspondent is something we calculate in relation to the
minimum (or maximum) year of the whole collection, but then you ALSO need to
multiply that value by 365 so it is properly spaced. (You need to do the same
thing with the maximum year value.) Once you have done that, you add the day value
to the year value.transform="translate()", which we discussed in SVG Exercise 5..html extension. (Interestingly, the
prefixes from your XQuery script magically disappear when you open the output file and
view its code!)script element signalling your JavaScript file in
your XQuery script, in case you need to go back and alter the XQuery to correct your
HTML.html root element:
               <!DOCTYPE html>
               <html xmlns="http://www.w3.org/1999/xhtml">
<oXygen/> should then give you a green light if all is well. Note: if there are
hashtags (#) starting your @id attributes, these will raise an HTML
validation error: you want to avoid outputting those.In your JavaScript you will likely be doing some familiar things you have already tried, but you will face new challenges, too. Think about what needs to happen in sequence:
g elements associated with particular correspondent
timelines. To toggle the display properties off and on involves writing JavaScript to
show or hide a particular line that the user is clicking on, that is, to change the
state from hidden to showing. In the CSS we set the default style for the correspondent
SVG g elements (the ones on which we had set @id attributes) to g[id] {display:none;}. We then wrote a JavaScript
function to override that and return display="block", which is the proper
display value for SVG elements.init(). That init() or initial() function
should add event listeners on the HTML elements that you expect your site visitors to
interact with. This is familiar territory, but we found ourselves writing the element
selection a little differently than we have done in the past: In our SVG, we set
@id attributes on each <input> element. We could have
just used getElementsByTagName(), but we thought we would show you a handy
selector in JavaScript that uses CSS syntax to identify elements that hold a
specific attribute called querySelectorAll(): We wrote it like this
to define an array of elements:
var inputSelect = document.querySelectorAll('input[id]');
That code creates an array of all the <input> elements that hold an
@id attribute. After this we set up a JavaScript for-loop with the range
variable i to step through each member of the array of
inputSelect.length, and then we set up our
addEventListener() to run on the inputSelect[i] (or the
svgSelect variable at position i), and to fire the next function in sequence in the
event of 'click', just as you have already done on previous
assignments.function
init().This function needs to check the @id value on the HTML
element that was clicked on, and to refer to that element, the one the user has just now
clicked on, we use the special JavaScript word this. To find the
@id on this, we write: this.id. What you need
to do with this.id is use it to find the corresponding SVG element whose
@id best matches. In our code, we added the string SVG_, so
we sought out the element with the id 'SVG_' + this.id to find the matching
group of SVG elements associated with a particular selected correspondent.if() else()
to change the display property of the matching SVG element. Remember that to check the
display condition of this, we need to use the double equal sign:
==, and use the single equal sign = to indicate a change in
value.this must first trigger another function that you write to make sure that the SVG elements are ALL hidden, before you trigger this to be visible. This does not require JavaScript to test conditions: it simply turns off the display for a selection as soon as the user visits another selection. We have examples of both approaches on the DHClass-Hub for you to consult.You will need to submit multiple files to complete this assignment:
We ask that you associate your files with relative URLs so that you can upload them to Courseweb or put them in place (in relation to each other) on whatever web server you wish to use. Submit this on Courseweb, but if you like, you may also mount your files on your newtFire or GitHub io webspace.